Showing posts with label Recipes. Show all posts

Feb 11, 2011

Make It {mexican hot chocolate}


I'm famous in certain circles for these, but this kicked-up hot chocolate may just become my new claim to fame. It's sweet & spicy with tingling heat and an espresso kick... think of it as the cold weather alternative to those (in)famous brownies...

Mexican Hot Chocolate
makes 2 cups

What you need:
50 grams good bittersweet or semisweet chocolate
2 cups milk (anything but skim)
1 teaspoon instant espresso powder
1-2 tablespoons light brown or turbinado sugar, to taste
½ teaspoon vanilla extract
1/2 teaspoon ground cinnamon
a pinch ground chipotle pepper

How you make it:
Coarse chop chocolate and combine with remaining ingredients in a small sauce pot. Bring to a simmer, stirring frequently to melt & combine chocolate. Serve immediately.

Jul 19, 2010

How to Host a Recession-Proof Dinner Party


I’m so tired of hearing about how badly the economy has tanked, aren’t you? I miss shopping, and traveling, and throwing parties with my friends… Ok, so your entertaining budget may not be what it once was, but that doesn’t mean you can’t invite your pals over for a seafood feast.

Clockwise from Top Left: Taking a pre-dinner soak, making the sauce, ready to eat, no forks needed, extra bowls for the shells.

Mussels may just be the cheapest way to feed a crowd short of serving them Ramen Noodles. They’re usually $2-3 per pound and you’ll need a half pound per person for a large appetizer portion. If you want to serve them as the main event, figure about a pound per person. Add a few loaves of bread and a bottle of wine and dinner is served. It’s so easy and your friends will be seriously impressed… and if like me, you find the idea of preparing shellfish at home a little intimidating, then you'll even impress yourself with how well these turn out! Just be sure to buy the freshest mussels you can find from a reputable seafood market and you'll be fine. I swear.

Throw a Dinner Party: Thai Red Curry Mussels

What you need:
2 teaspoons peanut oil, or canola oil
2 shallots, sliced thinly into rings (or 2 medium cloves garlic, minced)
1-inch piece of ginger, peeled & cut into matchsticks
Zest and juice of 1 lime
1-2 teaspoons Thai red curry paste
1 14-ounce can “lite” coconut milk
1 cup white wine
1 teaspoon salt
2 teaspoons fish sauce
1 green or red chili, sliced thinly (optional)
2-3 pounds mussels, scrubbed and de-bearded (see Tip)
1 bunch cilantro, chopped

How you make it:
Rinse mussels and place in a large pot of cool water about 30 minutes before you want to cook them. Inspect them carefully and discard any that have cracked shells or don’t close when you tap them. Farmed mussels don’t usually have beards (rough “hairs” that poke out of the shells), but if you find some that do just yank them off with your fingers or a pair of pliers. You have to de-beard the mussels just before you cook them though since pulling the beard off kills them.

Heat oil in a large high-sided skillet or Dutch oven over medium-high heat. Add garlic, ginger, lime zest and curry paste; cook until fragrant, stirring to break up the paste, 1 to 3 minutes. Add lime juice, coconut milk, wine, salt, fish sauce and chili (if using). Stir to combine everything and bring to a low boil for 2 minutes.

Strain mussels, add to pot, stir once or twice and cover. Cook over medium heat 6-8 minutes until the mussels open. Stir everything gently to coat with the sauce and top with a handful of chopped cilantro. Serve immediately with lots of bread for dipping.

NOTE: Want to try Belgium-style? Cook the mussels in a garlic, butter & white wine sauce and serve with French fries & beer – so good!

p.s. - Big thanks to Mrs. Weir for taking some pictures before we ate everything!

Jun 14, 2010

How To: Summer Salads

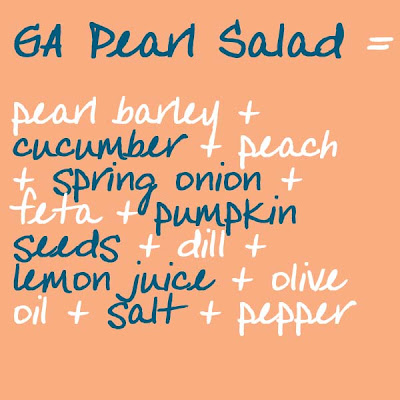
The Georgia Pearl Salad - recipe below

It's hot. Really hot. Like too hot to turn on the oven hot. But a gal's gotta eat, right? So open up the fridge, grab some supplies and start adding up your own summer salad... packed with whole grains, cheese and nuts, any combination you come up with will be filling and packed with protein.

Let's do a little Salad Arithmetic, shall we?

Start with a starch (pearl barley, couscous, orzo, rice, bulgur, quinoa)
+
a vegetable (cucumber, asparagus, spinach, carrot)
+
a fruit (peaches, mango, grapes, cherries, tomatoes, raisins)
+
an allium (yellow onion, red onion, scallion, shallot, garlic)
+
some cheese (feta, mozzarella, blue, parmesan)
+
a few nuts or seeds (pumpkin, almonds, cashews, sunflower, walnuts, pine nuts)
+
an herb (basil, dill, mint, parsley, thyme, oregano, chives, cilantro)
+
a little acid (lemon or lime juice, champagne vinegar, red wine vinegar, balsamic vinegar, rice vinegar)
+
some oil (olive, sesame, hazelnut, grapeseed)
+
a dash of seasoning (salt, pepper, ground cumin, cinnamon, chili powder, red chili flake, curry)
= 
a delicious & easy Summer Salad!

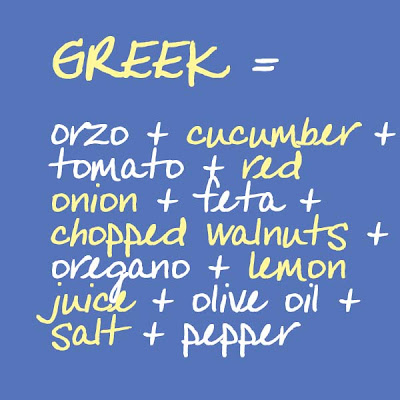
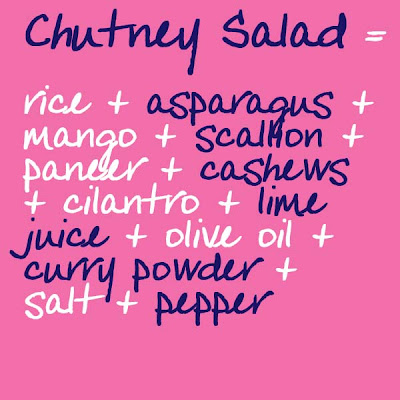
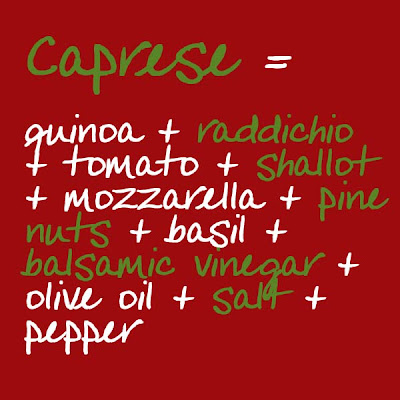
Some of my favorites...


Jun 9, 2010

Hello Sesame!

By special request...

Here's how I make the world's easiest spicy garlic sesame spinach:


Toast a small palmful of sesame seeds in a dry nonstick skillet over medium heat. Keep a close eye on them so they don't scorch. Once they've turned golden brown, remove from heat and set aside. Heat a teaspoon of toasted sesame oil and a teaspoon of spicy chili sesame oil in that same nonstick pan over medium heat. Add one clove of thinly sliced garlic and cook 1-2 minutes. Add 3 or 4 big handfuls of spinach leaves (you may have to do it in stages) and turn to coat with oil. Saute over medium heat until spinach has wilted to your liking. Top with reserved sesame seeds and serve with brown rice. Yum.

May 30, 2010

Spice Crispies


Adapted from a recipe that appeared in the February 2010 issue of Food & Wine, this Indian snack mix is a spicy, complex blend of salty & sweet. Put out a bowl with cocktails or serve instead of popcorn for movie night. It also makes a great traveling or hiking snack with a mix of salt, carbohydrates, sugar, protein and fat to keep you going.

MAKE IT: Spice Crispies

What you need:
4 cups puffed basmati rice*
1 cup cashew pieces
1 cup golden raisins
1 cup shredded coconut (sweetened is fine)
2 cups fried chickpea fritters or lentils*
6 TB vegetable oil
1 TB mustard seeds
2 tea cumin seeds
1 tea ground coriander
1 tea mild or medium curry powder
.5 tea red chili flakes (or more)
2 tea salt
1 TB amchoor (dried mango) powder*
6 TB light corn syrup
salt (optional)

How you make it:
Combine first 5 ingredients in a large bowl and stir to combine. Heat oil and mustard seeds in a medium non-stick saucepan over medium heat until seeds begin to pop. Reduce heat a bit and add next six ingredients, stirring to combine. Cook until cumin seeds begin to darken, add corn syrup and stir well. When corn syrup begins to bubble vigorously, remove pan from heat and pour spice syrup over contents in bowl. Mix gently until everything is coated in syrup, spread into even layers on two baking sheets lined in parchment paper, sprinkle with a little salt, and bake at 300 degrees until rice is crispy and cashews are turning golden, 20-30 minutes, stirring once or twice. Remove from oven and let mixture cool on pans for a few minutes before breaking up into bite size clusters. Store in an airtight container for up to 4 days.

*Available at Indian markets or on-line. You can certainly use a puffed rice cereal like Rice Krispies in place of the puffed basmati but no substitutions will really come close to the fried chickpea bits or tangy, tart mango powder so it’s worth the extra effort to get your hands on the real thing(s). Of course, while you’re at the Indian market you could just as easily grab a bag of ready-made snack mix, called chevda, but that’s not really in the spirit of things, is it?

May 20, 2010

Da Bomb


This salad is a protein bomb packed with soy, dairy and grain proteins, healthy fats and complex carbohydrates. Not to mention its beautiful colors and the delicious combo of sweet carrots, salty feta and nutty quinoa... it's a keeper.

Roasted Carrot & Red Quinoa Salad
with Honey Lime Vinaigriette 
4-6 servings

What you need:
4-5 large carrots, peeled & sliced into large bite-size pieces
3 TB olive oil
1 TB ground cumin
4 cups water
2 cups red quinoa
1.5 cups shelled soybeans (frozen works great)
4 oz. feta cheese, cubed or crumbled ( I used reduced fat)
1 large handful parsley, cilantro or combination of both, chopped

Juice of 2 limes (about .25 cup)
.5 cup olive oil
1 shallot, minced
1-2 TB honey
1 handful chives, chopped
salt & pepper to taste

How you make it:
Heat oven to 400 degrees. Toss carrots with olive oil and cumin and roast, turning occasionally, until tender and starting to brown – about 40 mins.

Meanwhile, heat water and quinoa in a pot over high heat until mixture comes to a boil. Reduce heat and simmer, stirring occasionally, until quinoa has absorbed all the water and is tender. Remove from heat, cover and set aside.

Heat a small saucepan of water over high heat until boiling and cook soybeans until tender. Drain and set aside.

Make dressing by combining lime juice, olive oil, shallot, one tablespoon of honey and chives. Mix well and add the additional tablespoon of honey if needed – it will depend on how tart your limes are – and salt & pepper to taste.

Combine carrots, quinoa, soybeans, feta and chopped herbs in a large bowl and toss with dressing. Serve hot or cold. 

Note: I found red quinoa at Trader Joe's but the regular kind will work just fine...

Apr 19, 2010

Great minds...

I really thought I had invented this dish. I was at a friend’s for dinner and we realized we didn’t have enough food for the number of people who had showed up. I hit the pantry looking for options and came up with a box of regular couscous, a can of chicken broth and a bag of golden raisins. A plan became to take shape and very soon after we set a beautiful bowl of couscous with raisins & mint out for dinner. It was a big hit that night and I’ve made it a few times since, always adapting the dish to fit what I have on hand.

Imagine my surprise then when I flipped open the March issue of Food Network Magazine (I wasn’t an early fan, but it’s getting much better) and saw a recipe for Israeli Couscous with Raisins. I had a bag of Israeli couscous so I decided to give it a try and ended up blending my recipe with theirs…enjoy!

MAKE THIS: Sweetly Spiced Israeli Couscous

I love sweet and savory dishes and this is an endlessly adaptable one. It makes a great side dish for a summer BBQ, or turn it into the main event by adding cubed, grilled chicken. Serves 4 as a side or 2 as a main salad.

What you need:
2-3 TB olive oil
1 onion, peeled and finely chopped
.25 tea ground cinnamon
1 8oz. bag of Israeli couscous
1 cup golden raisins
1 cup water
1 cup chicken broth
1 large handful of fresh mint, chopped
1 handful of pine nuts, toasted

How you make it:
Heat olive oil and saute onion and cinnamon in a small saucepan over medium heat until onions are softened and translucent. Add couscous and stir to coat in oil. Add water and broth, put lid on pan and simmer over low heat for 8-10 minutes until liquid is absorbed. You may need to remove the lid for the last minute of cooking to help the last bit of liquid to absorb or evaporate. Add raisins in last 1-2 minutes of cooking and stir to combine.

Remove couscous from heat, add mint and pine nuts and fluff with a fork. Season with salt and pepper to taste and serve warm or at room temperature.

Substitutions:
No raisins? Try diced dried apricots.
No mint? Parsley works well.
No pine nuts? I usually use toasted slivered almonds.

Feb 7, 2010

Sugar Baby


Next weekend, rather than celebrating the Hallmark/Hersheys holiday, I've planned a girls' weekend with some of my oldest pals. Instead of stocking up on store-bought snacks, I decided to whip up a few homemade candies for us to munch on. Because after all, what goes better with wine and girl talk than marshmallows, chocolate and peanut butter??

Sweet Treats: Cinnamon Marshmallows and Salted Peanut Butter Cups

Both recipes adapted from Jam It, Pickle It, Cure It. I got this book over the holidays and it's full of great food projects - always wanted to know how to cure your own bacon, make your own crackers or brew your own fruit liqueurs? Then you need this book. Not that adventurous? Don't worry, it also includes easy recipes for all kind of pickles, sauces and these sweet treats.

Cinnamon Marshmallows
These are fluffier and sweeter than the jet puffed ones we're all accustomed to. I added cinnamon to the original recipe but the possibilities are endless: cocoa, coconut, dried fruit, chai spices, toasted nuts or just leave 'em plain. Fire up the grill and make s'mores, top a cup of cocoa or eat them as is - they're delicious!

What you need:  
2/3 cup water, divided
3 (.25 oz.) envelopes unflavored gelatin  
1 cup granulated sugar
1 cup light corn syrup
pinch of kosher salt
1 tea vanilla extract
2 TB cinnamon (optional)
powdered sugar
vegetable oil

How you make them:
Lightly oil an 8x8" pan with vegetable oil and generously coat with powdered sugar. Set aside. Put 1/3 cup water in the bowl of a heavy duty stand mixer, add gelatin and let stand for about 10 minutes until gelatin has dissolved and softened.

In small saucepan combine remaining water, granulated sugar, corn syrup and salt. Place pan over medium high heat and cook, without stirring, until mixture reaches 240 degrees F. You'll need a candy thermometer and make sure it doesn't touch the bottom of the pan.

With mixer on low speed, carefully add hot syrup to the gelatin. Add the vanilla and turn the speed up to medium high.  Beat for 12-13 minutes until the mixture is thick, very white and holds peaks. If you're using additional flavors be sure to add them in the last minute of beating, before mixture becomes too thick.

Spread marshmallow in the 8x8 pan using a lightly oiled spatula and smooth it into corners. Set aside for one hour until marshmallow has completely cooled. Run a wet knife around the edges of the pan and turn the marshmallow out onto a sheet of waxed paper sprinkled liberally with powdered sugar. Cut into approx. 36 pieces and toss with powdered sugar and cinnamon until no longer sticky. Store in an airtight container, layers separated by sheets of wax paper, for up to one month. 

Salted Peanut Butter Cups
Good flaky salt makes all the difference here, the original recipe doesn't call for it but I think you really need Maldon salt, or something like it, to make these shine. Good quality chocolate helps too, though no one will turn them down if you stick with Nestle. I doubled the book's recipe - I just have a feeling they're going to be popular! 

What you need:
2 2/3 cups salted, shelled, roasted peanuts
2 tea vegetable oil
4 tea honey
4 TB powdered sugar
1 tea vanilla extract
4 cups semi sweet chocolate chips
Maldon flaked salt

How you make them:
Puree peanuts in a food processor until smooth. Add oil if they get too thick to blend. Add honey, powdered sugar and vanilla extract and continue to puree until everything is combined, scraping down the sides as needed.

Using clean hands, separate peanut butter filling into 24 pieces if using standard size cupcake liners or 36 pieces if using mini-muffin size liners. Roll filling between your palms and flatten slightly into disks. Set aside. Place paper liners in muffin pans and set aside.

Heat chocolate chips  in microwave for one minute on high. Stir with a fork and heat for another minute. Continue until chocolate is almost completely melted, stirring at the end to melt the last bits. Spoon two teaspoons of chocolate in each paper liner using the back of the spoon to push chocolate halfway up the sides. Drop peanut butter disks into each cup and tap them gently into the chocolate. Top with one more teaspoon of chocolate, smoothing it over the peanut butter filling and making sure it touches the chocolate on the bottom and the tops are smooth. Sprinkle with a pinch of salt.

Let peanut butter cups sit, undisturbed for at least 3-4 hours until chocolate has cooled and hardened. Store in an airtight container, at room temperature, for up to 2 weeks. 

Jan 27, 2010

I think I can, I think I can...

... and so can you!

Had dinner with a friend last week at one of our favorite spots and we ordered a gnocchi dish that was out of this world. Since I was still thinking about it a week later, I decided to try it at home. It's so easy!

I had a giant sweet potato so that’s what I used – but these would be great with a regular old russet too.

Sweet Potato Gnocchi in Brown Butter
Serves 3-4

What you need:
1 large sweet potato
1 cup all purpose flour, plus more for rolling
1 egg
1 cup finely grated parmesan cheese
salt & pepper to taste
3 TB butter

How you make it:
Poke the sweet potato all over with a fork and bake at 400 degrees until it’s completely cooked and soft all the way through. Scoop out all the flesh and set aside to cool for a few minutes.

Combine the sweet potato flesh with the remaining ingredients. You can certainly use a food mill or do it by hand, but I used the food processor to mix everything together into a smooth dough. Coat your hands and the counter in flour and working in thirds, roll the dough into a long log. Cut into pieces the size of a quarter and roll them loosely between your palms into a rounded oval shape. You’ll need to keep flouring your hands to keep everything from sticking. Gently roll the pieces off the back of a fork to give them the characteristic gnocchi look and repeat with the remaining dough.

Heat the butter in a wide frying pan over a medium flame until it bubbles and begins to brown. Meanwhile, bring a large pot of salted water to a boil and gently drop the gnocchi one at a time into the pot. They’ll float to the surface when they’re ready – just scoop them out with a slotted spoon and transfer them to the hot butter pan. Sauté for a few minutes, turning occasionally, until the gnocchi are slightly browned. Taste to see if they need a sprinkle of salt (mine did!) or parmesan and serve immediately.

At the restaurant, the parmesan gnocchi were served in a roasted acorn squash “bowl” that was delicious. I also roasted some acorn squash halves, and they were good, but the gnocchi is the real star of the show. 


Jan 10, 2010

Where the hell have you been?

Oh wait, that’s your line, isn’t it?

Gosh, the new year just rolled in over me like a ton of bricks. Long days at work followed by catch-up dinners with friends and topped off with a Southern Blizzard – a quarter inch of snow that fell late last week and brought the city to a screeching halt. There’s nothing like the threat of winter weather to send everyone running for the grocery store in a complete panic. But rather than milk and bread, why not grab the ingredients for this slow-simmered sauce and make a home-cooked dinner for your fella or friends?


This will take you an afternoon to make but it’s well worth it. Plus, it freezes beautifully so even if it’s just you, go ahead and make it to stash in the freezer. Serve with lots of red wine and round it out with a salad of arugula and orange segments with lemon vinaigrette and a little tiramisu for dessert. Ragu recipe adapted from Mario Batali.

What you need:
2 duck legs and 2 duck breasts, skin removed
4 tablespoons olive oil
1 medium yellow onion, peeled and finely chopped
1 medium carrot, peeled and finely chopped
2 cloves garlic, peeled and finely chopped
1 stalk celery, finely chopped
8 ounces red wine (Chianti preferred but any red wine that’s good enough to drink will work)
1 (28-ounce) can tomatoes, peeled & chopped
1 cup chicken stock
2 ounce dried porcini mushrooms
Salt and freshly ground black pepper
1 lb. short, wide pasta (campanelle or rigatoni)
3/4 cup flat leaf parsley, chopped
Grated or shaved parmesan cheese for topping

How you make it:
Wash the duck legs and breasts and remove all fat. Pat dry. In a large, heavy-bottomed pot or Dutch oven, heat the olive oil until smoking. Add the duck pieces and cook until brown on all sides then remove, about 10 to 12 minutes.

Add the onion, carrot, garlic and celery and cook until softened, about 7 to 9 minutes. Add the wine, tomatoes, chicken stock and dried mushrooms and bring to a boil. Add the duck pieces back to the pot and return to a boil, lower the heat, cover and allow to simmer for 1 hour. Remove the duck, pull all meat off the bones and return to pot, without the bones. Simmer uncovered for 30 minutes, or until quite thick. Season with salt and pepper.

Cook pasta in a large pot of salted water until "al dente", about 8 to 9 minutes. Drain pasta and toss with sauce. Stir in chopped parsley, top with parmesan and serve immediately.

NOTE: Most grocery stores stock whole, frozen ducks that you can cut into the pieces you’ll need. Just be sure to take it out of the freezer the night before so it has time to thaw!


Dec 4, 2009

DFO: Pasotto


Yeah, I know the name is stupid... stay with me, ok?

I really like Mark Bittman. I like what's he's done for food & cooking and while his newest ultra-health kick (and book) doesn't really speak to me, I'm a fan of his New York Times blog and that's where I came across this sorta recipe-slash-cooking method.

Dinner For One: Pasotto

Ok, so Bittman didn't come up with the silly name - that's all me. He calls it "Pasta with Chicken and Mushrooms, Risotto Style"... but that was a real mouthful & I left out the chicken so I really wanted to highlight the technique, not the ingredient list... you get the idea. Though the truth is, it doesn't matter what you call it - this stuff is pretty delish.

What you need:
1/2 lb. dried pasta, any short shape (I used Campenelle - short, wide noodles with frilly edges)
28oz. chicken or vegetable broth (you won't use all of it)
4-5 small portobello mushrooms, chopped (or any kind you like)
large shallot, minced
large garlic clove, minced
olive oil
butter
parmesan cheese & fresh herbs (optional)

How you make it:
Bittman has posted a short video which I highly recommend watching, but here's the synopsis... you're using the basic risotto method. Heat a swirl of olive oil & a pat of butter in a medium pot over medium heat. Add shallot & garlic and cook until soft & translucent. Add mushrooms and cook 2-3 minutes until softened. Add dried pasta & stir to coat in the oil/butter mixture. Add broth until the pasta is barely covered, cook over medium-low heat adding more broth as it gets absorbed into the noodles. When the pasta is cooked through and the remaining broth has reduced down to a thick sauce - it's ready. Add salt, pepper, cheese & herbs to taste.


Nov 22, 2009

Big Fat Greek Feta

Is it just me, or did the "holiday season" start a little early this year? Christmas carols are being piped through store stereos, it's impossible to park at the mall, and I actually passed an SUV with a big red bow stuck on it's hood... what happened to waiting until AFTER Turkey Day for all this nonsense?

First things first - Thanksgiving is this week and it deserves our full consideration. Yeah, December may bring all the presents, but the really good eating happens in November. 

So whether you're heading home to feast with family, across town to stuff yourself with friends or hosting the whole showdown at your place, start everybody off with this pretty baked feta appetizer.  It's full of greek flavors and takes just minutes to prepare - so you can appease the crowd with a snack and get back to business in the kitchen!


How to: Baked Greek Feta
Layer quarter-inch slices of good feta cheese in a shallow oven-proof serving dish, overlapping slices slightly. Scatter 8-10 chopped kalamata olives (pits removed) over the cheese and drizzle with olive oil and a little salt & black pepper. Place under the broiler until cheese is bubbling at the edges and starting to brown on top.  Remove from the oven - carefully! - and top with chopped fresh mint, lemon zest and red chili flakes. Serve hot with crusty bread or toasted pita.

NOTE: It's really important to use good feta cheese here - the commercially packaged feta from the grocery store is so tangy it'll be overpowering. I like to use the kind that comes in a container of water - it's usually imported from Greece. You may have to go to a farmers market or specialty market to find it.

Nov 11, 2009

Get Sauced

Perhaps you’ve heard of the Momofuku food empire? What started as a noodle shop in NYC has become a force to be reckoned with in the food world. Every time you turn around someone is praising the vision & talent of Momofuku’s founder, David Chang. He’s a regular mention in food magazines, was featured on the USA network, and he recently released his first cookbook.

I tried one of the recipes from the book this week, but rather than describe it, I’m going to let you read David’s instructions from an excerpt posted on Amazon.com - his enthusiasm and passion for food are addictive:

The dish goes something like this: boil 6 ounces of ramen noodles, drain, toss with 6 tablespoons Ginger Scallion Sauce (below); top the bowl with 1/4 cup each of Bamboo Shoots (page 54 of Momofuku); Quick-Pickled Cucumbers (page 65 of Momofuku); pan-roasted cauliflower (a little oil in a hot wide pan, 8 or so minutes over high heat, stirring occasionally, until the florets are dotted with brown and tender all the way through; season with salt); a pile of sliced scallions; and a sheet of toasted nori. But that’s because we’ve always got all that stuff on hand. Improvise to your needs, but know that you need ginger scallion sauce on your noodles, in your fridge, and in your life. For real.-- David Chang

Ingredients
2 1/2 cups thinly sliced scallions (greens and whites; from 1 to 2 large bunches)
1/2 cup finely minced peeled fresh ginger
1/4 cup grapeseed or other neutral oil
1 1/2 teaspoons usukuchi (light soy sauce)
3/4 teaspoon sherry vinegar
3/4 teaspoon kosher salt, or more to taste
(Makes about three cups)

Directions
Mix together the scallions, ginger, oil, soy, vinegar, and salt in a bowl. Taste and check for salt, adding more if needed. Though it’s best after 15 or 20 minutes of sitting, ginger scallion sauce is good from the minute it’s stirred together up to a day or two in the fridge. Use as directed, or apply as needed.

I actually added quite a bit more soy sauce to mine, but other than that I stayed pretty true to the noodle bowl he suggested and it was phenomenal. Though I did use the pickled carrots from a can of pickled jalapenos instead of the cucumbers he listed. I know, I know - I have a problem with those damn jalapenos!

And the sauce is just fantastic. You’ll come up with a thousand ways to use it – I’m trying to decide between a gingery pork stir fry or a pile of dumplings to dunk in it. But one thing I know for sure is that David’s right – Ginger Scallion Sauce now has a permanent place in my fridge.

Oct 29, 2009

Trick or Treat

Treat - for sure.

These Pumpkin Spice Whoopie Pies are going to be the triumph of my pumpkin-themed bash tomorrow night...

There are plenty of recipes to be found on the web for Pumpkin Whoopie Pies. I combined a few to come up with these - fluffy spiced cake with a cream cheese based frosting - I also tripled the usual amount of each ingredient to make an extra-large batch of 30 cookies. Trust me - your pals will eat every last one!


What you need:
Cookies
3 boxes yellow cake mix
2 15oz. cans pumpkin puree
2/3 cup vegetable oil
4 eggs
2 tea each cinnamon, nutmeg, ground ginger

Frosting
1 cup vegetable shortening
1 small jar marshmallow creme
1 8oz. block cream cheese
1 lb. powdered sugar
1 tea vanilla extract
2 TB cinnamon
2 TB water

How you make them:
Heat oven to 375 degrees. Mix cookie ingredients together in the largest bowl you can find. Batter will be very thick. Drop rounded tablespoons on a well-greased cookie sheet and bake for 10-12 minutes until cake is set and tops are lightly browned. Remove to a wire rack and let the cookies cool completely before frosting.

Beat frosting ingredients in a stand mixer on medium speed until well combined and smooth. Add water a few drops at a time to help it come together if you need to. Sandwich two cookies with a tablespoon (or more!) of frosting and store in a cool spot. 

NOTE: You can absolutely substitute pumpkin pie spice rather than using individual spices for the cookies.

Sep 28, 2009

The Book: Oktoberfest

Hmm... I may have missed the boat on this one this year - is Oktoberfest still going on? Do we even really need an excuse to invite our pals over and drink beer? Nah, I didn't think so...

Celebrate the arrival of October with this easy German-inspired menu. Lederhosen optional.

Oktoberfest
Late Sept/Early Oct.

MENU:
German Beer
Riesling
Skillet Sausage & Cabbage
Potato Salad w/ Warm Mustard Vinaigrette
Apple Pancake


Skillet Sausage & Cabbage
Serves 8

What you need:
2 (16oz) package of kielbasa or smoked turkey sausage, sliced diagonally into 1in. thick pieces
2 medium onions, thinly sliced
2 green bell peppers, seeded & thinly sliced
8 cups white cabbage, thinly sliced
1.5 cups dry white wine or chicken broth
1 teaspoon caraway seeds
salt & pepper to taste

How you make it:
Sauté sausage over med heat until browned, remove from pan & drain on paper towels. Do not clean pan, add onions & peppers and sauté until softened (2-3 minutes). Add cabbage and cook, stirring often until softened (7-8 minutes). Add sausage, wine or broth and seasonings. Reduce heat and cook over low flame until cabbage is tender (10 minutes).

NOTE:
Want to make it even easier? Take it to the grill:
Grill Brats or 6” lengths of kielbasa, serve hotdog-style on buns with purchased sauerkraut.


Potato Salad w/ Warm Mustard Vinaigrette
Serves 8

What you need:
3 pounds potatoes (such as Yukon Gold), peeled and cut into 1-inch cubes
1 tablespoon kosher salt
1/3 cup champagne vinegar
1  cup extra virgin olive oil  
2 tablespoons coarse-grain mustard
1 small bunch fresh tarragon, roughly chopped
1/4 teaspoon freshly ground black pepper
Salt

How you make it:
Place the potatoes and salt in a medium pot and add enough cold water to cover by 2 inches. Bring to a boil. Reduce heat and simmer until the potatoes are fork-tender, about 15 minutes. Drain and transfer to a serving dish. Whisk together the vinegar, olive oil and mustard in a small bowl. Pour half the mixture over the hot potatoes, toss, and let stand for 1 hour. Just before serving, drizzle the remaining vinaigrette mixture over the potatoes, add the tarragon and pepper, and toss. Taste and add salt as needed.

NOTE: Drizzling the vinaigrette over the potatoes while they're hot helps them absorb the tasty liquid more readily.


German Apple Pancake
Serves 8

What you need:
4 eggs
1/2 cup unbleached all-purpose flour
1/2 teaspoon baking powder
1 tablespoon sugar
1 pinch salt
1 cup milk
1 teaspoon vanilla extract
2 tablespoons unsalted butter, melted
1/2 teaspoon ground nutmeg

1/4 cup unsalted butter
1/2 cup white sugar, divided
1/2 teaspoon ground cinnamon
1/2 teaspoon ground nutmeg
1 large tart apple - peeled, cored and sliced

How you make it:
In a large bowl, blend eggs, flour, baking powder, sugar and salt. Gradually mix in milk, stirring constantly. Add vanilla, melted butter and 1/2 teaspoon nutmeg. Let batter stand for 30 minutes or overnight.

Preheat oven to 425 degrees.

Melt butter in a 10 inch oven proof skillet, brushing butter up on the sides of the pan. In a small bowl, combine 1/4 cup sugar, cinnamon and 1/2 teaspoon nutmeg. Sprinkle mixture over the butter. Line the pan with apple slices. Sprinkle remaining sugar over apples. Place pan over medium-high heat until the mixture bubbles, and then gently pour the batter mixture over the apples.

Bake in preheated oven for 15 minutes. Reduce heat to 375 degrees and bake for 10 minutes. Flip pancake onto serving platter and cut into wedges.

Sep 13, 2009

Sunday is Soup Day

Sundays were made for soup. They were also made for lounging around on the couch in your PJs, drinking coffee and reading the paper – but you can do all that while your soup bubbles away on the stove. Sunday is also a great day to entertain since you’ll have all day to cook and get ready leisurely. In my family, we always have dinner together on Sundays. It’s our time to catch up, talk about what’s going on and share a good meal. These days, not many of us still live in the same cities as our families, so why not treat your friends like family and invite them over for a Sunday Supper?

Keep it casual and easy – big bowls of soup, hunks of crusty bread, maybe a simple salad if you’re so inclined… just a comforting home-cooked meal to help everyone ease out of the weekend and get ready for the week ahead. This is one of my favorites:


Mulligatawny
Serves 8-10

Stock
1 whole chicken, 3-4 pounds, cut into 5-6 pieces
4 Granny Smith apples, coarsely chopped
4 large carrots, peeled and coarsely chopped
4 celery stalks, coarsely chopped
2 medium onions, coarsely chopped
1 head of garlic, cut in half crosswise to expose all the cloves
3-4 bay leaves
2” piece of ginger, coarsely chopped
2 TB black peppercorns
5-6 whole cardamom pods

Soup
4 TB butter
1 medium onion, peeled & finely chopped
1 large carrot, peeled & finely chopped
1 large celery stalk, finely chopped
1 cup rice
3/4 cup red lentils
1/4 cup flour
1 tea ground coriander
1 TB garlic, minced
3 TB curry paste, yellow or red
1 1/2 tea salt
1 tea ground black pepper
Chopped cilantro for serving

Make the Stock:
Pull out the biggest pot you have and dump all the stock ingredients in it. Add enough cold water to completely cover the chicken and vegetables and bring it to a boil. Reduce heat and gently simmer for one hour. The vegetables will be mushy and the chicken should fall off the bones easily.

Remove the chicken pieces from the pot, discard the skin and bones and shred the meat. Strain the stock and discard the vegetables and spices. If you want, you can let the stock cool and skim off whatever fat accumulates. But the fat adds richness, so I like to go ahead and finish the soup right away as is.

Make the Soup:
In the same large pot, melt butter over medium heat and add onions, carrots and celery. Cook ten minutes, stirring often until vegetables are soft. Add rice and lentils and cook two minutes, stirring constantly. Add flour, garlic, curry paste and about half a cup of the stock. Cook for two minutes, stirring to dissolve the curry paste and get everything evenly combined. Add the remaining stock (You should have 8-10 cups) slowly – about a cup at a time, stirring in between. Cook for about ten minutes or until rice and lentils are tender. Add shredded chicken, salt and pepper. When chicken is heated through, serve soup with chopped cilantro sprinkled on top.


NOTES:
Don’t feel like making your own stock? You can use store-bought stock or low sodium chicken broth – you’ll just need to tweak it a bit. While you’re sweating the soup vegetables, heat the broth in a separate pot and let it simmer with a piece of garlic and a few cardamom pods until you’re ready for it. When it’s time, simply scoop out the spices. You may want to add a peeled, chopped green apple in with the onions, carrots & celery – the sweetness is really great here, so you don’t want to loose it.

You can absolutely make this the day before – but it will thicken as it cools so you may need to add a few cups of water or stock when you reheat it gently. Not having people over? No problem. Just let the soup cool and divide it into single-serving plastic containers. Pop them in the freezer and you’ll have soup all season long!

Sep 9, 2009

DFO: Squashed Gnocchi

You know when you think up something late at night, maybe after a glass of cheap chardonnay or two, and you think it's completely brilliant and then the next morning you realize it's really, really stupid? Yeah... that's pretty much what happened when I was trying to decide what to call this dish.


But, stupid name notwithstanding, it's really fabulous and easy so give it a try-

Dinner For One: Squashed Gnocchi

This is serious comfort food - heavy, creamy & incredibly filling - you might want to have a salad for lunch. I just so happened to have some leftover roasted acorn squash on hand but I realize that's pretty rare. If it were me, I wouldn't cook squash just to make this - I'd use a canned version, but you do whatever suits you.

What you'll need:
1 package potato gnocchi
1 TB butter
2 cloves garlic, minced
.5 cup cooked squash, diced into small pieces
.5 cup half & half
Salt, pepper, red chili flakes & chopped fresh rosemary to taste
Parmesan cheese, grated for top (optional & totally indulgent)

How you make it:
Cook gnocchi in salted boiling water according to package instructions. Meanwhile, heat butter in a wide-bottomed pan and cook garlic over low heat until it begins to turn golden. Add squash and half & half. Use a fork to smush squash until it melds with the cream into a (more or less) smooth sauce. Add spices and keep warm until gnocchi are ready. 

When it's time, add gnocchi and a splash of its cooking water to pan, stir everything very gently until gnocchi are coated & serve with a sprinkle of parmesan and extra herbs-

Note: I really like rosemary but it's a strong flavor and some folks aren't that fond of it. That's cool 'cause sage would be incredible in this, as would thyme. And butternut squash would be great. You know the rules - adapt the recipe to use what you have and what you like. Because really, what doesn't taste good with cream & butter? 


Aug 31, 2009

Fools Rush In

Ok, maybe I got a little carried away. It is still technically August after all, so it’s a tad early for roasting & such. But I was at the farmer’s market this weekend and it was full of apples and root vegetables and gourds of all shapes and sizes and it was all so unexpected and unusual after months of juicy peaches and ripe berries and sweet tender greens. And somehow I ended up with an acorn squash.

Now I don’t know about you, but I think acorn squash just cries out for roasting. So I complied with its request and popped that bad boy in the oven with a dash of olive oil, a pinch of garam masala spice, and a generous sprinkle of salt & pepper. At 400 degrees it took about an hour for the wedges to brown and become tender.

And then?

Well, then it was only just ok… sweet and subtle and not particularly thrilling really. I think it could have thrilled me – maybe with a roasted chicken or pork loin alongside or whipped into a rich pasta filling… but quite frankly, the oven had already been on for an hour, it was 80 degrees outside and I was starting to break a sweat.

The truth is, it’s just not roasting weather quite yet. So I spun my squash around with a little crumbled cow’s milk feta and then, oh then… it was downright delightful. Somewhere between savory and sweet with a little salty tang - it hints of the past and promises a comforting future - perfect for our present, somewhere between Summer and Fall.


An interesting and unexpected pairing, serve it as a salad at room temp or a side for your last BBQ of the season. And remember, good things may come to those who wait - but sometimes it's ok to peek ahead!

Aug 24, 2009

Farewell Friend

Oh Summer, what happened?

It seems like just yesterday we were heralding your arrival, pulling out swimsuits and beach towels, and shaving our legs more regularly. But in two weeks it will be Labor Day and then Fall will show up, and we’ll be braising and roasting, and you’ll be gone.

How about before you go we have one last hurrah? We’ll invite over some pals, fire up the grill and sit out on the deck drinking margaritas until the sun goes down. Doesn’t that sound like fun?

What to serve for our summer send-off? How about a sweet, spicy shrimp & pineapple salsa? More substantial than a traditional salsa, it’s a perfect way to kick off your fresh fiesta.


A cross between ceviche and a salsa, this chunky relish is great with tortilla chips, or as a topping for grilled chicken or fish. Don’t like pineapple? Try it with mango, peaches or any type of melon – it’ll be great.

Shrimp & Pineapple Salsa
Serves 6 as a starter

What you need:
8-10 medium shrimp, peeled, de-veined & tails removed (I use frozen)
8oz pineapple tidbits in juice
1 jalapeno, stemmed, seeded & finely chopped
half of a red onion, finely chopped
juice of 1 lime
large handful of cilantro, stemmed & chopped
large pinch of salt (maybe 2, you’ll have to taste it)
Chips for serving 

How to make it:
Cook shrimp in boiling water until pink. Drain and let cool, then cut each shrimp into 4-5 small pieces. Combine with remaining ingredients (including juice from pineapple) and stir to combine.

This is better after it sits for awhile, so make it as far ahead as you can and leave, covered, in the fridge until you’re ready to serve.


Aug 17, 2009

5 Reasons: Quiche


1. It's a great way to use up bits & pieces you have lying around - any veggies, cheeses and/or meats will work. A quick inspection of my fridge yielded half an onion, a few handfuls of spinach, two kinds of cheese and an open bag of cooked turkey bacon crumbles (TOTALLY doesn't qualify as bacon but when you're desperate...).

2. You get incredible mileage out of just three eggs. Here's the basic recipe I used:
Preheat oven to 350 degrees. Place ready-to-bake pie crust (by all means make your own if you're so inclined) in a pie pan and sprinkle a handful of cheese on the bottom. Put 3 cups of veggies and/or meats in the pan and spread them out in an even layer. Beat together 3 eggs, 2 TB all purpose flour, 1 cup milk, salt & pepper. Pour egg mixture in the pan, pressing down on everything to make sure it's submerged. Sprinkle another handful of cheese over the top and bake for 40-45 minutes until center is set, crust is golden and cheese is browned in spots.

3. It's great any time of day. Case in point - I made this one for lunch Saturday. It was delicious. Then I had a piece before heading out Saturday night. Still delicious. Got home in the early morning hours Sunday and seriously considered having a piece - it would have been delicious but I was too tired to even chew. Went to bed, woke up later Sunday morning and had a piece for breakfast. Yep, morning was just as delicious as noon & night. 

4. My friend Kate loves it for all these reasons and more.

5. You won't have to share it with any men. Men, as a general rule, do not like quiche. If offered to them, they will scoff at it. No one really understands why because if you were to offer them a piece of spinach and bacon "pie" (for example) they would gladly eat a piece the size of their head. Go figure.